The next step in our shower floor repair, after the concrete pre-pan is constructed is to install the plastic pan liner. The plastic pan liner is placed over the slanted pre-pan and on top of the plastic pan liner is where we’ll set our concrete shower floor. You see, the grout in between your shower floor tile is porous, water will seep through it and saturate the concrete underneath. The reason we have the plastic pan liner is so that all the water that seeps through the grout of your shower floor tiles will stop at the plastic pan liner and be diverted to the shower drain. 
That is the reason why the concrete pre-pan has to have a proper slope to it! When we lay down the plastic pan liner over the concrete pre-pan, the plastic will have the proper slope and all that water that seeps through your shower floor to the plastic liner will go straight down the drain.
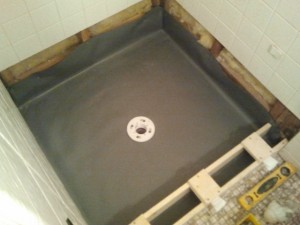
In this picture the plastic pan liner is already in place. This plastic pan liner is grey, others are red but they are all made of a durable 40mil plastic. The pan liner should be placed so that you have enough to go up the shower walls about six inches. The corners of the liner are folded in, kind of like wrapping a present in reverse. When constructing a shower from scratch, I like to leave a small gap with the framing in the corners so that I can feed the extra plastic from the corner fold in the plastic liner into those gaps in the framing and eliminate the folded over corners of the plastic which x3 can equal about 1/4″ and make it difficult to level a wall perfectly. In the repair of an existing shower however this is of course not possible but I’ll show you how I work around that one in a minute!
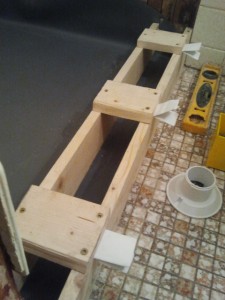
 As I stated in the previous blog Shower floor repair, many of the shower floors that do leak water causing costly damages, do so around the shower curb. It is a very problematic area for most shower pan’s (except mine)! The reason why my shower pans do not have a chance of water leakage around the shower curb is because I make my curbs out of concrete versus 2×4’s. See the previous blog Shower floor repair for a detailed explanation. In the photo on the left you can see how I make my shower curb “form” which I’ll fill with concrete at the same time I lay the concrete for my shower floor. What is hard to see in the picture is the 3/4″ gap between the shower floor and the inside of the shower curb form. You see, what I want to do is create a shower floor and curb in one solid piece of concrete. Further more, I want to make sure that my plastic pan liner is imbedded inside my concrete curb.
Then there’s those 3 funny looking pieces of paper under each block that constructs my curb form, they do serve a purpose! they create just enough slope to my curb form so that after it’s tiled, any water that slashes onto the curb will run back into the shower and not onto the bathroom floor. Not a serious problem but definitely annoying if you have to dry the bathroom floor after every shower!
Next (pictured right) I installed 1/4″ Hardibacker board on the walls above the plastic shower pan liner. I chose 1/4″ instead of 1/2″ because… Remember I mentioned that when you fold the corners of the plastic pan liner over they can become quite thick, about 1/4″. Since the rest of the tiled shower was built with 1/2″ backer material the corners of the shower floor when tiled, will not protrude from the rest of the shower because my 1/4″ Hardibacker plus the folded plastic liner will be just about 1/2″ thick. The reason I install my backer board above the pan liner before I pour my concrete floor is so that I can adhere the backer board to the studs with two small screws towards the top of the backer board above my plastic pan liner holding it in place yet not compromising the waterproof worthiness of the shower pan. Then when I pour my concrete slab the Hardibacker will be held securely in place and ready to be tile on! 
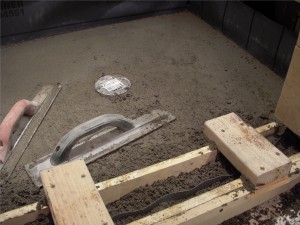
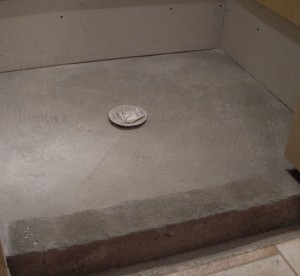
The last step of the shower pan construction is to pour my 3/4″ shower floor bed and fill my curb form. You can see here how I have the plastic pan liner come up towards the outside of my curb. This way after a glass door is in place and water is pouring down over your curb saturating the grout and seeping down into the curb itself, your protected #1 from any moisture escaping and causing damage to your home and #2 the curb is made of concrete and will never rot out as many shower curbs do since most are made with and covered with backerboard. Which is the leading cause of why shower pans eventually fail!
And finally you have a one piece solid concrete shower pan and curb guaranteed never to leak and will last for a hundred years or more!
Building a shower pan (correctly) takes both knowledge and practice of all the materials used in the construction process. This blog post is meant for informational purposes only about what it takes to create a reliable shower pan. It by no means is a tutorial as I haven’t covered every single aspect due to the length of the blog post. If you are in need of a shower repair or a shower pan built for new construction please seek the help of an experienced professional! The costly ramifications due to an impaired shower pan or shower construction far exceeds the money you’ll save with someone who doesn’t specialize in shower construction.


One Response to Shower floor repair – pan liner, curb, and finish coat